Learning Android Development
Beyond the Frame: Full-Screen Apps with Android’s Edge-To-Edge API
Leveraging Android’s new enableEdgeToEdge API to create full screen apps

Introduction
Recently I stumbled upon a fascinating tool in the world of Android development, i.e. enableEdgeToEdge API and after integrating it into my Android app, I realise how easy this API makes it to display app’s UI beyond the confines of System Bars (Status & Navigation).
This article explains a bit about this API and an entry-level implementation of it in Jetpack Compose, to achieve full-screen UI of your Android app.
Embracing Edge-to-Edge designs
Recent advancements in design tools for Mobile applications and the upgrades in the UI/UX fields in terms of ideologies and new concepts of UI, it is becoming extremely popular to extend a Mobile app’s interface (or UI) to draw beyond system’s status bars.
We (or Google’s term) call this phenomenon as “going Edge-to-Edge”, i.e. displaying app’s content that occupies full size of user’s device. This means the app’s UI will not only extend horizontally to match screen’s width, but it’ll match full screen’s height as well, and hence the UI is drawn behind the system bars.
These system bars are primarily of two types, viz. Status bar at the top and the Navigation bar (including both Button & Gesture navigation) at the very bottom of the screen.
How we did it till now?
Since displaying content full screen existed earlier as well, there were a certain steps that we used to follow earlier. These are already properly explained in this Medium article by Chris Banes, summarizing here:
- Using
WindowCompat.setDecorFitsSystemWindows(window, false)API on Activity - Changing System bar colors from theme.xml considering Android APIs for backwards compatibility
- Adjusting the UI and insetting the draw area so that our primary content does not get obstructed by the system bars
- For Jetpack Compose, we had Accompanist System UI Controller API which helped achieving these results, but is deprecated now
This approach worked fine until now and still works if implemented properly, but there’s a headache in terms of colors management and having multiple theme files as per different configurations while supporting for backwards compatibility. Also, adjusting the UI as per the “safe” draw area is a bit tricky in some cases.
Revealing new API “enableEdgeToEdge”
We have now a new API enableEdgeToEdge() available as a simple Extension function for ComponentActivity — EdgeToEdge.enableEdgeToEdge
For Jetpack Compose, this API plays a crucial role, as the Accompanist API systemUIController is deprecated now with this new API being its replacement.
This API internally handles the full screen requirements in a backwards-compatible manner, so we don’t have to worry about it anymore while providing a simpler way to define the colors to display in the system bars.
Implementation made easy
Here are the steps to integrate this API in your Android app
The app without enabling edge to edge content currently looks like this:

A) Dependency- This API comes with standard Activity dependency:
dependencies {

    def activity_version = "1.8.2" // May change in future

    // Java language implementation
    implementation "androidx.activity:activity:$activity_version"

    // Kotlin
    implementation "androidx.activity:activity-ktx:$activity_version"
}
Now we have the API ready to use in our code.
B) Usage in ComponentActivity- In the onCreate method as follows:
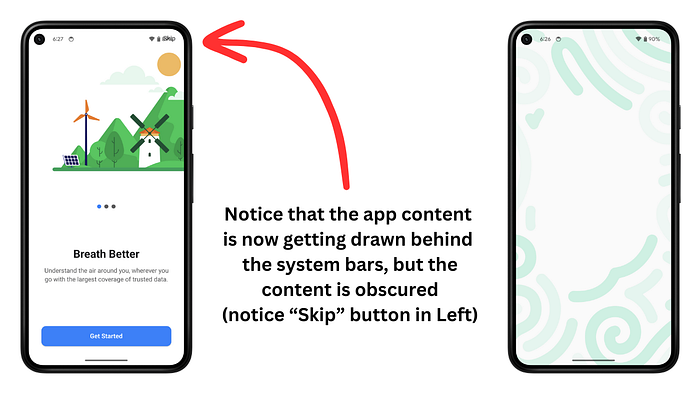
If you run your app at this moment, you’ll already see it getting drawn edge-to-edge, i.e. behind the system bars. But the colors may not be correct and the app content will be obstructed by the system bars.
The app now looks like this:
To fix this, there are some steps (or code) that we have to perform.
C) Assigning proper colors to system bars
We can call the same API enableEdgeToEdgewith System Bar styles applied to it in the setContent method. I have created a common Composable function to achieve this in a reusable manner.
This code is inspired from Google’s NowInAndroid app — https://github.com/android/nowinandroid which is super useful app for clearing complex concepts, establishes proper how-to’s and is all about Jetpack Compose. Do check it out for further inspirations!
Then, use it in Activity as follows:
Alright, with this, we have our app displaying the content edge to edge and the system bar colors are also appropriate.
But still, the UI is being drawn behind the system bars and we need to do something to ensure that is is padded in such a way that the primary content will always be drawn in the “safe” area.
D) “Safe” aware WindowInsets
This is similar to Flutter’s SafeArea widget and does the same thing — Insetting the content in such a way that it is not obstructed by the system UI, in this case system bars.
We let the background of the screen flow behind the system bars, but the actual content is padded (or insetted) in such a way that it gets rendered in between the system bars. This is achieved by using “Safe” window insets of 3 types:
For brevity of this article, the details of all these “Safe” insets are not explained here and you may have a look at — https://developer.android.com/jetpack/compose/layouts/insets#inset-fundamentals
So, we will use the safeDrawing WindowInset for our use case, to pad the content below system bars. Quickly explaining, this will always ensure to apply just enough padding only to our draw content so as to not draw it behind the system bars.
Then we can wrap our content in any container Composable, such as a Box or a Scaffold in Compose and apply this inset to the wrapper, so that it ensures our content is not gets drawn behind the system bars.
A typical Scaffold then will look like this:
We can then wrap all our different screens under this Scaffold and all the content is automatically drawn “Safely” with background content going behind the system bars!
Note: Only apply safeDrawing to screens in which the UI must be drawn below system bars. For illustrations and graphics, it is usually preferable to keep them rendering behind system bars. In such cases, use plain
Boxcomposable instead!
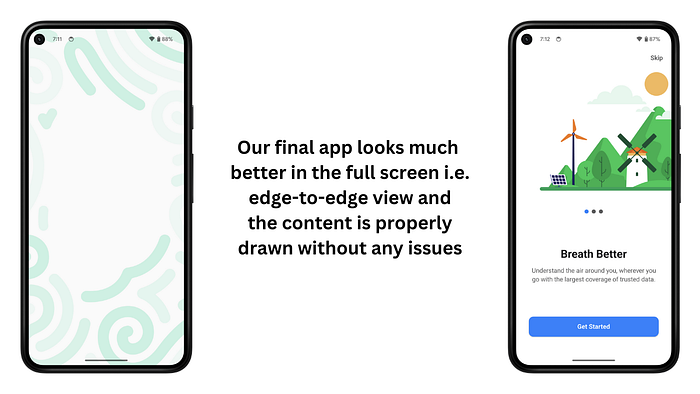
Our final app now looks much better applying this:
Conclusion
So, what do you think? As we come to the end of our exploration into the Edge-to-Edge API, it’s clear that this innovative tool opens up a world of possibilities for Android developers.
You may get all the unified code from my Github repository for the Air Quality Index app that I’m building — https://github.com/dkexception/aqi-app and do check the “NowInAndroid” app by Google as well!
So why wait? Dive in, experiment, and discover the full-screen brilliance that awaits your Android apps.

